

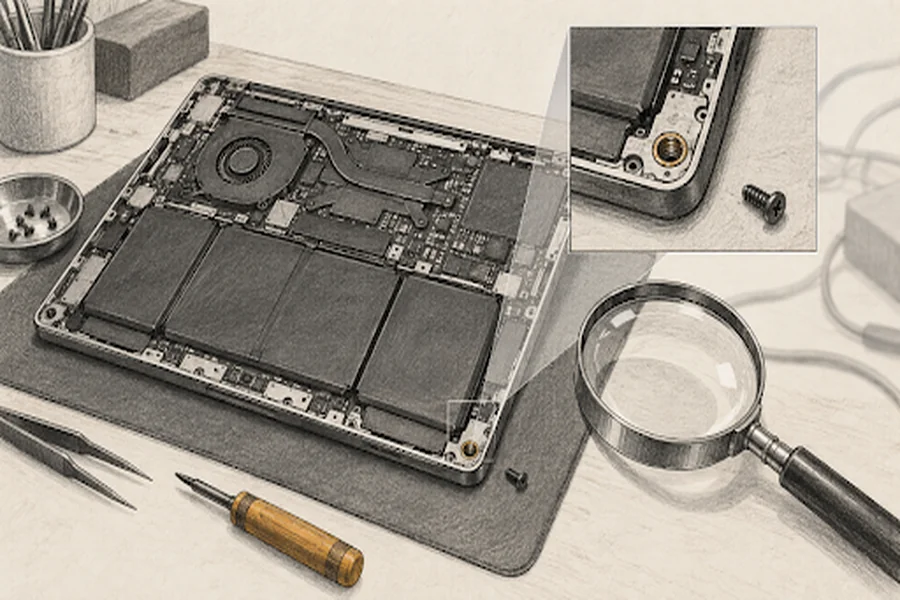
The empty screw hole in a teardown photograph may be the most useful detail in the frame. A technician can see that a fastener was missing before the repair began. An image cleanup tool may see an irregular dark patch and fill it. Once that happens, the photograph no longer answers the question the workshop needs it to answer.
This is a difficult assignment for an AI Photo Editor because the defects are often the subject. A bent connector, residue near a socket and an uneven cable route may explain the fault. The first editing decision is which of those details the photograph must preserve.
Decide What The Photograph Must Prove Later
A teardown image can serve several people. The technician needs the assembly order. A colleague needs to understand a diagnosis. The customer may need to see why a part was replaced. Decide which job this particular image serves before choosing any cleanup. One wide orientation shot and a separate close photograph of the defect often do more than a single heavily polished picture.
Suppose a laptop arrives with a loose hinge and an empty mounting position. The missing screw is relevant even if nobody yet knows why it is absent. Photograph that state before touching the hinge. Include enough surrounding structure to locate the hole, and retain another view showing the whole assembly. Keep the intake observation separate from the eventual diagnosis: the technician may discover additional damage after removing the hinge cover.
PicEditor AI accepts an uploaded photograph and a written editing request. For a workshop, that makes it a possible presentation tool after the record exists. Its output cannot establish whether a screw was present, whether corrosion was active or whether a component caused the failure. Those conclusions require the original observations and appropriate physical checks.
Distinguish Bench Clutter From The Fault Itself
A coffee cup at the far edge of the bench may be irrelevant. A loose washer beside the hinge may have fallen from the assembly. Until its role is known, keep it in the record. The technician who opened the device should identify removable clutter; a designer looking only at the photograph may not know which small objects matter.
Make A Component Record Before Editing
Number the visible fasteners and connectors on a copy of the source. Record whether each is fitted, removed, missing or obscured. Those are different states. An obscured screw should not become “missing” in the notes, and a missing screw should not be regenerated into the image to make the layout symmetrical.
Keep annotations in an ordinary drawing or layout application so they remain editable. A short description such as “upper hinge socket, empty on arrival” is more useful than an arrow with no explanation. Record the device identifier privately and use a separate public image if serial numbers or customer information need masking.
Take another photograph when reflection or shallow focus prevents a reliable reading. Enhancement can increase apparent sharpness without resolving the underlying uncertainty. An AI Photo Editor should not be asked to decide the shape of a connector pin that the camera never captured clearly. Moving the light or camera is usually the more direct repair to the evidence.
The component record also protects against mistakes in assembly guides. If a photograph was taken after a cable was disconnected, label that stage. A cleaned image of the open device can otherwise look like the expected finished configuration. Keep the stage description attached to the file when it leaves the repair folder.
Remove Only Clutter Outside The Documented Device
Start with a request that has a visible boundary: remove the cup in the upper corner while preserving the device, loose parts and their shadows. Avoid “make this teardown look professional.” That invitation is broad enough to smooth residue, regularize screw spacing and straighten a deliberately exposed cable.
In PicEditor AI, use the source photograph as the reference for that bounded change. Save the candidate separately. Inspect the entire device afterward, including areas outside the requested edit. A written instruction expresses the desired boundary but does not prove that the output stayed within it.
A photo editing tool is most useful here when it reduces a distraction without forcing the technician to recheck dozens of altered parts. If the first candidate changes hardware, try a crop or a visible mask over the irrelevant background. The extra polish may not justify another generative pass.
Choose the photo editing tool according to the job. Cropping, rotating and placing an arrow are predictable operations in a conventional editor. Generative cleanup becomes relevant when an unwanted background object overlaps a complicated surface. That harder case also demands a closer comparison with the source.
For the loose-hinge example, a cup behind the laptop may be removable while the same cup reflected in the glossy screen is harder to isolate. Leaving that reflection is a reasonable choice. The reader needs to understand the empty mounting position, and spending time rebuilding an irrelevant reflection contributes little to that explanation.
Compare Every Diagnostic Zone With The Source
Open the original and candidate at the same scale. Work through the numbered component record, marking each item as unchanged or needing investigation. Check the empty mounting position first, then the hinge edge, cable path and nearby loose parts. Starting with the fault keeps an attractive background from setting the tone of the review.
Use Both Detail And Assembly Views
A close crop reveals altered pin shapes and filled scratches. The assembly view reveals shifted proportions and changed relationships. A connector can look plausible in isolation while moving slightly relative to the socket. Alternate between both views rather than relying on one large zoom.
Look specifically for duplicated screws, smooth patches where residue existed and shadows that imply a raised component has become flush. Compare color cautiously: an automatic lighting correction can make a stain less obvious without removing it. If that stain is part of the diagnosis, preserve its visibility in the customer-facing image.
Ask a second technician to read the picture and explain what they think happened. Their answer should agree with the documented state, including uncertainty. If they conclude that all fasteners were present because the edited image suggests it, reject the candidate. A note elsewhere in the report does not repair the photograph.
Deliver An Annotated Record Of The Actual Repair
PicEditor AI can help with a presentation copy when the evidence is already clear and cleanup is confined to the surroundings. Keep the untouched source available alongside it, especially when the picture supports a diagnosis or a conversation with the customer.
Save the accepted image with the repair stage and component notes. The next technician should be able to identify the empty socket, understand when it was photographed and follow the repair without guessing which details were changed. That is a stronger workshop image than one whose defects have disappeared into a tidy finish.